Showing posts with label graphite. Show all posts

Sunday, March 6, 2016

Scottish Highland Cattle ~ Work in Graphite

The humble beginnings to a neglected work of art...  Here is the start to the Highland cattle drawing.   For the beginning, the graph has been my life saver.  The cattle are just gorgeous with their disheveled rusty locks of hair.   But why do they have so much of it! LOL  So for beginning accuracy's sake, I decided to stick close to the squares.  After that, I am not immensely worried.  It is kind of one of those things that helps in the beginning, since... Once you start a little off, you are always off... and it will only get worse.  :(  


I have compared some of my drawings to working on a jigsaw puzzle.  This composition really brings that statement home.  The dreaded jigsaw puzzle that all of the pieces look the same! LOL 


Not sure why I got distracted from a start on this one.  It is never a good sign, when I look at a photo and can see in my mind the drawing finished.  This unfortunately was one of those photos.  At any rate,  I am anxious to see this one in its entirety. 

Tuesday, February 17, 2015

Baby in Graphite Finished

This little guy has been finished for awhile now.  I have been letting him sit until my eyes can take a renewed look at him.  The little nubby shirt that he has on was a little flat initially.  I went back in with the click eraser and rubbed in some details.  This subtle addition made me happy and did not give overwhelming clarity to an area that should be understated.  Over all, I am extremely happy with the finish. 
 
There were some challenges to this portrait.  To begin with, the initial photograph was done in a studio.  By the look of the eyes, I question that the trick of digitally enhancing the pupil and life spot was put into play.  Although this can come across as a sharper image in a photograph, it looks flat and lifeless when translated into a graphite drawing.  I took some artistic license and came up with matching reflections to help create a translucent covering to the iris and pupil.  Also, every part of this photograph appeared to be in focus for the most part... Great in a photograph-- distracting for a graphite portrait. So, I let his left arm become less defined as it projects toward the viewer.  It gives some depth to the composition and leads the eye to the main focus of the face.  My final challenge on this piece resides in the completion of it.  Just look at this little guy.  How do you get over the cuteness?  I mean really?  I feel like he is a part of my life now... Captured in a time capsule of my own creation.  Now, I prepare myself to sign my name and move on... With the completion of a piece, there is always the overwhelming sense of accomplishment mixed with a slight twist of emptiness...  *sigh*  This can only be lessened by starting a new adventure.  So, I will move on to a new beginning.  


Sunday, January 11, 2015

Baby in Graphite WIP 8

 
I am moving right along on the little guy.  Amazing how much work can get done by just setting a little time aside to relax and draw.  ;)  The shoulder cuff and top half of his left arm are all that are left to do.  It might take a little longer with the thermal shirt, but this is where the grid helps me to save a ton of time.  It keeps all the minute details in line.  The  overall piece will get some darkness added to it, once the whole composition is filled in.  My next post should be the finished piece!  :)


Thursday, January 8, 2015

Baby in Graphite WIP 7

Happy New Year Everyone!  My wishes for a wonderful 2015 for us all.  I usually like to start the New Year with a finish, but there were circumstances beyond my control that prevented the completion of  this work.  That's alright!  We enjoyed a quiet and warm Christmas here in Northern Illinois, so I am not complaining.  :) 

Since January has been welcomed in with sub zero temps,  I have migrated back into the warm studio area of our house.  There has been some productive work going on and thoughts are being given to this year's goals.  Very little work has been produced at my board over the past year... *sigh*...  I have been giving serious thought to some goal setting for the year, but that can wait for another time.  Here is the progress on the little man who currently resides on my board.

 
He is a real doll and shaping up well.  The zipper on the jacket is a little tedious, but it has been moving along well.  One of my short term goals is to get him finished in the next week. :)

Sunday, October 19, 2014

Baby in Graphite WIP 6

The photo below shows how the portrait looks after the initial blending.  As you can see, there are subtle changes on the skin that give it minimal definition.  Since the graphite is blended over the majority of the area, the missing highlights make a huge difference in the appearance of the skin (easiest to see on the dark ear).   The harsh lighting to the right was left alone for maximum impact.  This step is always exciting and a little frightening at the same time, because I know a major change is about to happen with the chiseling out of the features. :)


The right side of the face (from our point of view) held the harshest lighting and darkest shadows.  So, graphite was pulled out with a kneaded and click eraser and more layers added to the folds of the ear, creases under the eye, cheek and jaw line... again, with the most noticeable change being the ear.  This has to be my most favorite part of graphite work.  The initial mapping can be so tedious, which is amazing since I will physically smear all of that hard work, but this step makes it all worth while.  I can still make out plane changes and those careful details simply get built up to the finished product.


I put a few shadows under his face to help determine whether my shading on the lower jaw was dark enough.  The face is going to be left alone until the clothing has been completed.  Clothing is a major comfort zone for me, so I look forward to getting lost in the folds.  ;)

Thursday, October 16, 2014

Baby in Graphite WIP 5

Here is a glimpse into the early work stages of the skin in a portrait.  This photo captures the initial mapping of the rest of the check area and ear.  Although this little guys skin is baby smooth, the beginning layout of graphite is subtle for all types of subjects, even if the person has advanced age lines.  There might be a few areas that the pencil lines are very tight and appear more dense; but overall, this is simply a road map of where the shadows and plane changes appear.   It is a little difficult to see the pencil marks on the Bristol in this size, but you can click on the image to enlarge.  The next step will be to blend the entire area with the exception of small areas of  harsh highlights.  Then, the erasing and building up of graphite will begin.  :)


Thursday, September 11, 2014

Baby in Graphite WIP 4

Such a tremendous change in temperature around here,  I can honestly say that it is chilly outside.  My time has been split between working on my Hummingbird quilt (while the real ones fight at the feeder outside my window) and making a little more progress at the drawing board.  Here is a glimpse of this little guy's eye after it has had its initial blending... very flat, but you can see the undercurrent of what the depth of his iris will be.


After a little lifting of graphite-- more blending-- more lifting etc. etc., here is where the eye is at currently.  A little more definition and some highlights to the lashes are needed, but it is getting closer to completion.  ;)


Thursday, August 28, 2014

Baby in Graphite WIP 3

Vacation and a warmer than usual studio have slowed progress on this drawing.   This photo was taken with my overhead light on.  It was an intentional wash out to lose the blotchy look from lack of natural light.  As you can see, I am working my way across the forehead.   Not too much time is being spent in that area until the eye makes an appearance.  The darkest shading from the eye will be what sets the tone for the area surrounding, but I wanted to get the basic shading in.  Babies have such an odd hairline.  It is fun to try and make the fuzzy new hair come to life. 


Sunday, July 27, 2014

Baby in Graphite WIP 2

Where is the rest of the hair?  The question ran across my mind last night after I had already begun work on this little guy's mouth. LOL  All I really remember was sitting down, wondering how difficult the nose would be to shape, and finding myself correcting the line drawing on the lower lip while contemplating it.  One line led to shading, and shading led to working my way up to his nose.  Once it occurred to me that I really should have continued with the hair, I was too far gone.   The work flow goes like that some times, and as we all know, the rest of the drawing will get done in its own time. :)
 
The mouth had lots of nice creases and dark shading compared to the rest of the features, but the lack of size made it take a little more time than I anticipated.  But after all the layering and erasing, I am satisfied with the results. 
 
In this updated photo, the features appear to have a lot of contrast, but that is a trick of the camera.  The shading is true to the graphite that created it and very subtle in appearance.  So for my preference, a softer lead will come out at a later time and give a little more push to the darkest areas.


His nose has such slight variations in the skin tone.  Kind of crazy really, since there is a lot going on in that small area.  The nostrils always have that defining outer edge and inner shadow, but the area surrounding them could almost make one insane with the lack of strong contrasts.  I took a slight amount of artistic license to pull it together and was tempted to keep moving to the right.  But, I decided to stop myself at that point.  I really need to keep moving up or risk losing a place to rest my hand. ;)


Thursday, July 24, 2014

Graphite Baby Portrait WIP Continued

I am moving right along into the hair.  With the exception of the long wisps on the top, this little guy has some very light and super fine hair.  It is really challenging me.  For right now, the goal is to finish all the hair and then step back and refine it.  The camera's focus was on his facial features, leaving the hair with very little definition.  It almost blends in with the underlying flesh tone.  I am not sure if a little artistic license will be needed, when it is all on paper. 


Graphite is not the kindest form of art to photograph.  I purchased a Canon Rebel T3i for Christmas and need to start messing with the settings and lighting.  But I think, this shows the work well enough for now.  :)

Saturday, July 19, 2014

Graphite Baby Portrait on Bristol WIP

We have been having the most beautiful weather this week, including today-- my birthday. ;)  I have been able to open the door to my little studio and work away without a fan drying out my eyes.  It has been such a pleasure spending time finding my way thru the maze of an infant's face.  Drawing is tied with walking as a stress reliever in my life... very therapeutic.
 
Here is quick look at the progress on my attempt at a baby portrait.  My initial shading began on the ear... HUGE mistake.  It was reminiscent of starting on the nose of Anne.  So right away, I switched my attention to the eye.  By picking the darkest spot on his face, it has set the tone for the rest of the shading. 
 
I am finding that infant skin does not require as much mapping as compared to an adults.  But with less mapping comes the challenge of making the subtle transitions show up but not overwhelm the features-- or worse, make the skin do some unusual caving or projecting outward.  It has been an enjoyable process to work with a new type of subject matter.  His hair makes me a little nervous, since it is very light.  So, I am heading in that direction next.  :)   


Wednesday, July 16, 2014

Baby Portrait in Graphite ~ New Huion Light Pad

With space being in limited supply around my studio, I decided to replace my old light box with the new Huion Light Pad.  The pad is 23.5 inches with a working space of 16 x 12.  Since it is one of the larger models, it has a regular cord that plugs into the wall.  You cannot see it from the photo, but there is a spot that is flush on the upper left corner that controls the brightness.  One touch turns it on.  Continued pressure gradually makes the pad brighter, peaking at the brightest, then back to dark.  An additional touch after returning to dark, turns off the pad.  It is truly a space saver being under a half an inch thick.  It is also run by LED lighting, so it should have illuminating longevity in its future. :)


The light pad throws off quite a bit of a glow in the studio on its brightest setting.  The huge plus is that I found a use for my plexi drawing bridge.  When placed underneath, it helps to give the right amount of tilt when transferring a drawing.


My son's baby portraits were done with a full body pose.  So, the hunt has been on for a facial portrait of an infant around half a year or older.  This was a little bit more of a challenge than I thought.  Thankfully, a friend came up with an old photo. :) 

Just to show the intensity of the pad, here is the set up for the transfer on the newest composition.  I sketched out the drawing on transfer paper and used a ultra fine black marker to eliminate smudging.  In this photo, the sketch is under a piece of Bristol board.  The Huion holds its own in the illumination department.  Plus, it does not create a light that irritates my vision! :)


Saturday, April 19, 2014

Anne Hatheway Graphite Portrait ~ Finished

The weather outside was filled with  sunshine and warmth today.   Beautiful weather for the local Easter egg hunts.  :)  My morning was spent running errands and the afternoon cleaning our little pond.   After all the days activities came to an end, I was able to spend the evening drawing in my messy little studio with windows wide open. *sigh*    As you can see below, the portrait has been completed.  I am pleased with the results and feel that I have learned a lot during the process.   My fear of doing human portraits has been lessened by sticking with this one till completion.  I am so happy that I didn't shelve it a few posts back. :)   


I look forward to relaxing tomorrow... Easter will be a day of enjoying a visit with family and contemplating my next subject.  Although there are a few animal compositions that would be fun,  I find myself wondering how difficult an infant portrait would be to render on Bristol.  The features would be such a challenge from everything that I have done before.  Of course, a bigger challenge would be finding a descent photo to draw from! ;)  I will have to go on a mad search of friends, family or the Internet again.   I will more than likely have to draw another subject in the between time and that's okay, too.  :)  For right now, I am ready to put away this piece.  Since tomorrow will be here soon, I would like to wish you all ...

A Happy Easter!


Thursday, April 17, 2014

Darkening Portrait with 9b Wood Case Pencil ~ Anne Hatheway

 I decided to keep fiddling with this project.  The nice thing about not being in the middle of a consignment is the lack of fear to go out on a limb.  The 9b wood case pencil was used heavily in the hair to bring in some harsh contrast.  The free handed style seems to give the hair a more natural appearance; even though, the overall flow is similar to the photograph.  The composition still has a ways to go but here is the progress.


The facial features were darkened with a lighter application of 9b, since there is very subtle shading in that area.  Hopefully, I will wrap this study up over the weekend.  :)

Wednesday, January 8, 2014

Graphite Pencil Sketch of Actress Anne Hathaway WIP

My mind has been preoccupied with the idea of working on some subjects that are out of my comfort zone for drawing.  With the ringing in of the New Year, I made a resolution to spend more time on my art and push my self imposed boundaries.  It has been on my mind for some time to work on human facial features, but I have been having troubles locating descent photos to work from.  Although I hadn't given much thought to the fan art movement, it is hard not to notice the wealth of celebrity photos on the internet.  There is a regular treasure trove of subjects to choose from.  After looking thru numerous photos, I settled on a small 4x6 of Anne Hathaway.  She has some strong features that work perfectly to practice on.  Plus, the photo of her had some heavy shadowing that I really need to have when creating graphite drawings. 
 
As you can see below, I have a line drawing that was sketched on transfer paper.  This has always been my method, so that I always have the original drawing in case of false starts. ;)


 **For those that are new to the Sketches blog, I have a few grids of various sizes drawn on Bristol board that I mount the transfer paper on.  I choose the grid that fits the size that I am blowing the drawing up to.  After the line drawing is done, I mark the dimensions of the grid on the paper and transfer the drawing onto Bristol board.  The grid marks on the drawing are used to recreate a grid on the areas of the drawing that have a lot of detail and will be blended with graphite in the finished composition.  The grid, in this case, was constructed over her face and part of her neck.


I would love to show you my early blending on this composition, but blogger would only let me load one picture.  Hopefully, blogger will get its glitches fixed over the next few days.  I can tell you that I initially struggled with the nose and almost threw the drawing out. Time will tell if the features start to come together. :)

Wednesday, November 6, 2013

Field Mouse in Hand Graphite Drawing WIP 8

The months have been flying by.  I went full time at work as of October 1st and have spent the last month training for a new task at my work place.  The past weeks have been a little crazy on my mind with  going back to learning a position from the ground up, but the trade off was a set daytime schedule.  It brings a sense of calmness to my life.  So presently, I am ready to throw myself into finishing this drawing and getting on to some ideas that I would like to try.
 
At this point, I can honestly say that I am tired of working on the dark background.   The layering required for a dark background tires my hand out.  Although, I did start using a Prismacolor Turquoise pencil about half way through and was amazed how easy the graphite adhered to the Bristol. It made me wish that I would have grabbed that pencil to begin with! ;)   The darkness of the background needs to be smoothed out, and there are still some lighter details that need to emerge with the help of a handy eraser, but there is no hurry.  I am going to start looking through some promising photographs and start laying out the next project.  A little overlapping of subjects will do me good. :)    
 

Wednesday, September 11, 2013

Field Mouse in Hand Graphite Drawing WIP 7

As you can see, the 6b has been put to work on this drawing.  I am in the process of layering it and will add the lighter objects after by pulling them out with an eraser.  Looking back at the progress of this piece, I contemplate background vs. plain Bristol.  Although the stark blank background would give the piece a bold-charged impact of a human hand projecting off of a blank sheet of paper, I like the continuity (my nemesis yet best friend) of the darkness grounding the subject and giving it a more meditative feel.  After all,  this is suppose to be a portrait of sorts.  Hmmmm... Just thinking out loud. ;) 


Click to Enlarge 

Friday, July 12, 2013

Field Mouse on Hand 6

A little more graphite blended onto the hand and here is the progress on the drawing.  It will still need some refining before the decision is made about the background.  There has always been debates on how my backgrounds should be handled.  Many of my peers think that it should be left blank to add to the effect of the hand coming off of the page.  I have always opted to put the background in.  After looking back through my blog, it is obvious where this technique has been successful.   It is equally obvious (to me anyways) on a few compositions where a background left out might have been a slight improvement.  I guess that I am just not sold on celestial free floating objects.  It seems that I need to ground my drawings to the world that they are associated with.  :)  


Monday, June 17, 2013

Field Mouse in Hand 5

 
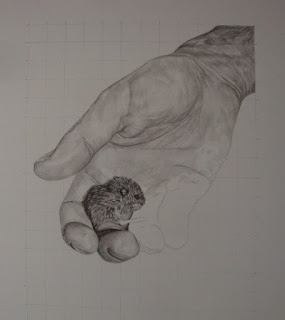
The field mouse made his entry into the composition this weekend.  It was a pleasure to work on such a small area of fur.  I had to make sure and keep my eraser sanded, so his light hairs would be tiny, sharp and clean.  Here he was at the beginning of the weekend...


 And here he is now...   His foot is the last area to be completed.  I am leaving that until the finger underneath has been rendered.  A background is necessary when creating the light hairs.  :)


Tuesday, June 4, 2013

Field Mouse in Hand 4


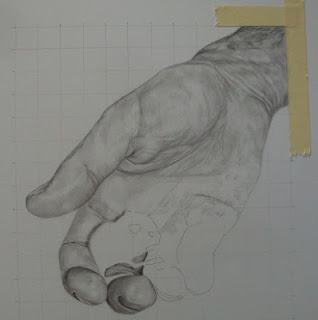
The wrist tends to be the area of the composition that is so busy.  I intentionally crop my photos to leave a portion of the wrist and arm.  The area is vital to give that extra push of dimension to the hand that is being rendered. It is also the most interesting part for me to draw.  The skin is usually richer in depth as it recedes into the background.  The hair being present is such a wonderful contrast to the texture of the skin.   Most importantly, the wrist is the area most influenced by what lies under the surface of the skin:  muscles twisting, bones pushing, and the subtle shades of the underlying vascular system.   I cannot express how important it is to the impact of the composition for me to have this area present.   The complexity of the wrists sets off the simplicity of the hand in such a strong way.
 
As you can see, the graphite has been worked to the mid point of the palm.  I decided to stop in that area, so the focus can turn to the little field mouse.  This will leave me enough blank area to the right of the little critter to rest my drawing hand without smudging the details. 
 
For those new friends arriving to Sketches, the you will notice that I edge the corner of my drawing with tape.  It is a special non acidic drafting tape.  There mustn't be erasures to the area that it is being applied, or the chance of damage to the Bristol is greatly heightened.  I find that this tape works very  in keeping my edges crisp and clean.